Connecting a condenser microphone to your computer can be a daunting task, especially if you’re new to the world of audio recording. But fear not, we’ve got you covered! In this article, we’ll walk you through everything you need to know about connecting your condenser microphone to your computer, from understanding the basics of condenser microphones to troubleshooting common issues.
Whether you’re a podcaster, musician, or just someone who wants to improve the audio quality of their video calls, connecting a condenser microphone to your computer is a great way to get started. With a few simple steps, you can take your audio quality to the next level and achieve professional-sounding recordings.
So, grab your microphone and let’s get started! In the following sections, we’ll cover everything you need to know to connect your condenser microphone to your computer and start recording high-quality audio.
Understanding Condenser Microphones

If you’re new to recording audio, you may be wondering what a condenser microphone is and how it differs from other types of microphones. In this section, we’ll take a closer look at condenser microphones and their advantages.
Types of Condenser Microphones
There are two main types of condenser microphones: large-diaphragm and small-diaphragm. Large-diaphragm condenser microphones are often used for vocals and other sources that require a warm and full sound.
Small-diaphragm condenser microphones are typically used for recording instruments and other sources that require a more transparent and detailed sound.
Advantages of Condenser Microphones
Condenser microphones have several advantages over other types of microphones. One of the biggest advantages is their sensitivity. Condenser microphones are able to pick up subtle nuances in sound that other microphones may miss.
They also have a wider frequency response, which means they can capture a wider range of frequencies.
Another advantage of condenser microphones is their low noise floor. This means that they are able to capture sound without adding any unwanted noise to the recording. Condenser microphones are also able to handle high sound pressure levels, which makes them suitable for recording loud sources such as drums and electric guitars.
Related Posts:
- Discover the Best Picks in Beginner Condenser Microphones
- Clear Speech Tips for Condenser Microphone Users
- The durability of condenser microphones over time
Required Equipment and Setup
Connecting a condenser microphone to your computer requires some essential equipment. In this section, we will discuss the necessary equipment and how to set it up.
Audio Interface
An audio interface is an essential piece of equipment that connects your condenser microphone to your computer. It acts as a bridge between the microphone and the computer, allowing you to record high-quality audio.
There are many audio interfaces available in the market, and you need to choose one that suits your needs.
Microphone Cables
Microphone cables are used to connect your condenser microphone to the audio interface. XLR cables are the most common type of microphone cables used for this purpose. They have three pins and are designed to carry balanced audio signals.
You can choose the length of the cable based on your recording setup.
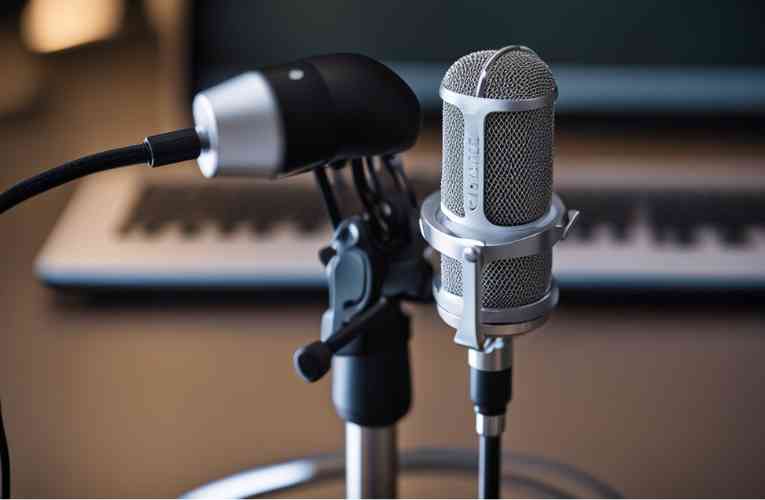
Mic Stand and Shock Mount
A mic stand and shock mount are essential accessories that help you position your condenser microphone correctly. A mic stand holds the microphone in place, while a shock mount isolates it from vibrations and other unwanted noises.
You can adjust the height and angle of the mic stand to get the best recording position.
How to Connect Condenser Microphone to Computer?
Connecting a condenser microphone to your computer can seem daunting, but it’s actually a straightforward process. In this section, we’ll go over the physical connection steps and software configuration.
Physical Connection Steps
To connect your condenser microphone to your computer, you’ll need an XLR cable and an audio interface or mixer. Follow these steps:
- Plug one end of the XLR cable into your microphone.
- Plug the other end of the XLR cable into your audio interface or mixer.
- Connect your audio interface or mixer to your computer using a USB cable.
Once you’ve made these connections, your microphone should be ready to use.
Software Configuration
After connecting your microphone to your computer, you’ll need to configure your software settings. Here’s how to do it on Windows 10:
- Right-click on the speaker icon in the bottom right corner of your screen and select “Open Sound settings.”
- In the Sound settings window, scroll down to the “Input” section and click on the “Manage sound devices” link.
- Under the “Input devices” section, locate your condenser microphone and click on it.
- Click on the “Device properties” link and then select the “Additional device properties” link.
- In the Properties window, click on the “Levels” tab and adjust the microphone volume as needed.
On a Mac computer, you can configure your settings by going to “System Preferences” and selecting “Sound.” From there, you can adjust your input volume and select your microphone.
Related Posts:
Troubleshooting Common Issues
If you’re having trouble connecting your condenser microphone to your computer, don’t worry. There are a few common issues that you can troubleshoot in order to get your microphone up and running.
Hardware Troubleshooting
The first step in troubleshooting any hardware issue is to ensure that all of your cables and connections are secure. Make sure that your microphone is properly plugged into your computer’s audio input, and that all of your cables are in good condition.
If you’re using an XLR microphone, make sure that your XLR cable is properly connected to your microphone and your audio interface.
If your microphone still isn’t working, try connecting it to a different computer or audio interface. This will help you determine whether the issue is with your microphone or your computer.
Software Troubleshooting
If your hardware is working properly, but you’re still having issues with your microphone, you may need to troubleshoot your software. Start by checking your computer’s audio settings to make sure that your microphone is recognized and enabled.
If your microphone is recognized but not working properly, you may need to update your drivers. Outdated or corrupted drivers can often lead to compatibility issues between your condenser microphone and your computer.
To ensure seamless recognition and functionality, it’s essential to keep your device drivers up to date. Here’s how to update the drivers for your microphone:
- Open the Device Manager on your computer.
- Locate your microphone under the “Audio inputs and outputs” section.
- Right-click on your microphone and select “Update driver.”
- Follow the on-screen instructions to update your driver.
If updating your drivers doesn’t solve the issue, you may need to troubleshoot your recording software. Make sure that your recording software is properly configured to recognize your microphone, and that your microphone is selected as the input device. If you’re still having issues, try using a different recording software to see if the issue persists.
Conclusion
Connecting a condenser microphone to your computer can seem daunting, but with the right equipment and knowledge, it can be a straightforward process.
To summarize, you will need a condenser microphone, an audio interface or USB cable, and possibly a phantom power supply. Make sure to choose the appropriate connection method (XLR or USB) based on your recording setup and intended use.
Once you have connected your microphone, be sure to configure it properly and adjust the levels to achieve the best possible sound quality.
Remember to also consider the environment in which you are recording, as background noise and room acoustics can greatly affect the final product.
With these tips and tricks, you can confidently connect your condenser microphone to your computer and start producing professional-grade audio.
Frequently Asked Questions
What steps are needed to set up a condenser microphone on a Windows 10 PC?
To set up a condenser microphone on a Windows 10 PC, you need to follow these steps:
1. Connect the microphone to your computer using either an XLR cable or a USB cable.
2. Open the Sound settings on your computer by right-clicking on the speaker icon in the taskbar and selecting “Sounds”.
3. Select the “Recording” tab and choose your microphone from the list of available devices.
4. Click on “Set as Default” to make your microphone the default recording device.
5. Adjust the input levels of your microphone by clicking on “Properties” and selecting the “Levels” tab.
6. Test your microphone by speaking into it and checking the levels on the screen.est your microphone by speaking into it and checking the levels on the screen.
Can I use a condenser microphone with a smartphone, and if so, how?
Yes, you can use a condenser microphone with a smartphone, but you need to use an adapter. You can buy an adapter that connects your microphone to your smartphone’s headphone jack or lightning port. Once you have the adapter, you can plug in your microphone and start recording.
What is the process for connecting a condenser microphone to a laptop without using phantom power?
If you want to connect a condenser microphone to a laptop without using phantom power, you can use an audio interface. An audio interface is a device that converts the analog signal from your microphone into a digital signal that your computer can understand. You can connect your microphone to the audio interface using an XLR cable, and then connect the audio interface to your computer using a USB cable.
How do I properly connect a condenser microphone to an audio interface?
To connect a condenser microphone to an audio interface, you need to follow these steps:
1. Connect your microphone to the audio interface using an XLR cable.
2. Connect the audio interface to your computer using a USB cable.
3. Turn on the phantom power on your audio interface.
4. Adjust the gain on your audio interface to get a good signal level.
6. Test your microphone by speaking into it and checking the levels on the screen.
Is it possible to use a condenser microphone for live performances, and what equipment is required?
Yes, it is possible to use a condenser microphone for live performances, but you need to use a microphone preamp and a mixer. A microphone preamp is a device that amplifies the signal from your microphone, and a mixer is a device that allows you to mix multiple audio sources together. You can connect your microphone to the preamp using an XLR cable, and then connect the preamp to the mixer using another XLR cable. From there, you can connect the mixer to your PA system or recording device.
Can a condenser microphone be used with a USB connection, and what are the implications?
Yes, a condenser microphone can be used with a USB connection, but there are some implications. When you use a USB connection, you are bypassing the need for an audio interface, which means that you may not get the same level of control over your signal. Additionally, some USB microphones have built-in preamps and gain controls, which can affect the sound quality of your recordings. However, USB microphones are generally more affordable and easier to use than XLR microphones.